Printing a barcode on a badge is not always a straight forward procedure. It is important to know and understand the barcode you need to print. Barcodes come in two flavors: those that are font types and those that aren't. The barcodes that are not font types, specifically UPC codes, must be created using special software. Intelli-Site cannot print these. Intelli-Site can only print barcodes that can be represented as a simple font.
You must determine the font needed for the barcode and install it on the computer that will print the badges. Some common ones are Code 39, Code 128, and Interleaved 2 of 5. Some fonts include the Arabic number below the barcode, and some do not. Below are examples of each. Both are numbers 0-9.


As you can see, even though both barcodes are 0123456789, they look very different. The scanning equipment you have will determine the font you use.
Many scanners require delimiters, also known as start and stop characters. These delimiters are at the beginning and end of the barcode to indicate to the scanner where the code begins and ends. The above examples do not have these delimiters and so will not work for scanners that require delimiters. The asterisk, '*', is most commonly used as the delimiter, but it is not the only delimiter. Below is the barcode for *0123456789*.

Consult your scanner documentation to determine the proper font and start and stop characters. Then install the font on the computer that will print the badges. With the font installed, and armed with the knowledge of the correct delimiters for your scanner, you are ready to setup Intelli-Site to print barcodes on badges.
There are 2 steps to to print a barcode on a badge:
- Add fields to the database specific to barcodes
- Add the barcode objects to the Badge design
Add a field to the database for the Start and Stop Codes
The majority of sites run in what's called Single ID mode, meaning each card holder has one and only one card or set of credentials assigned. But many sites have multiple cards or credentials assigned to their card holders. This is referred to as Multi-ID mode. This is important because the database structures are different depending on the mode. This affects where the barcode fields will be added. The process is generally the same. The differences will be noted as we go along.
- In the Tree, expand the
 node, then
  and
and  . This is where the differences between the two modes can be seen. In Single ID, the target table is the Addresses table as seen below. In Multi-ID, the target table is the Dossier table. There is only one or the other.
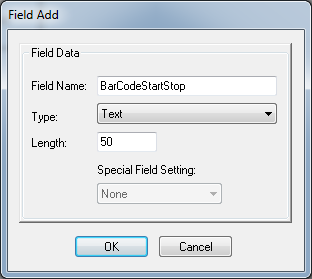
- Add the field to enable printing Start and Stop Codes by right-clicking on the target table (Addresses or Dossier) and selecting "Add Node and Edit...". The "Field Add" dialog will appear. Fill in the name for the field. Then click <OK>.
- The Properties dialog for the field that was just added appears. Click <Ok>. Nothing needs to be modified.
Add the Barcode field
If the field you want to use for the barcode information (i.e., employee number, student number, etc.) does not exist, you must add it. It must be added to the CardData screen as well so that when a card/badge holder is added, the barcode information can be added too. Of course, you may use an existing field if one will fulfill your needs. This article will walk you through the simplest case, adding an employee number to the database and adding it to the CardData screen.
NOTE: In Multi-ID mode, remember that barcodes are part of a card and not a Dossier. The card holder must have a card associated to be able to SAVE the desired badge design in Card Management mode.
NOTE: The Card Number field can be used as the barcode field. If the Card Number is the desired field, skip to the next section.
- Using the same steps as above, add another field and name it EmployeeNO. Field names cannot have spaces.
- In Design Mode, expand
 then double click on
  . You will now be edit the CardData screen.
 - Drag and drop the EmployeeNO field from the table onto CardData screen. Move it around until you are satisfied with its placement.
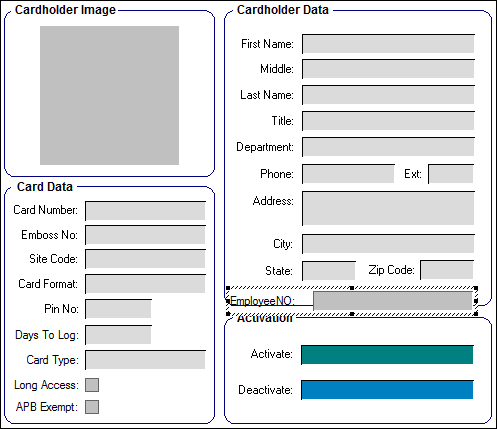
To change the label, bring up the properties of the screen object by right-clicking on it. Switch to the "States" tab. Change the label to what you want it to be.
With these two fields added to the database, you are ready to modify the badge.
There are three badge designs in Intelli-Site:
- Intelli-Site Horizontal
- Intelli-Site Vertical
- Visitor Vertical
These are examples and used as templates for your badge designs. The following will walk you through adding your own badge design and adding the barcode objects to it.
- In the Tree, expand
 .
. - Right-click on
 and select "Add Node and Edit..." The Add Node dialog appears.
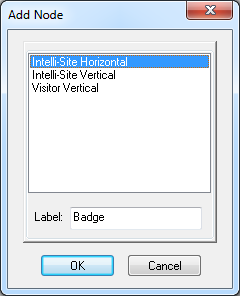
- Highlight the desired template and enter the name for the badge design in the Label: field. Click <OK>. The new design appears in the list in the Tree. The Property Page is opened for your convenience. Click <Ok>.
- Expand the badge design that was just added. You will see nodes for Front and Back. These are the designs for the front of the badge and the back of the badge. We will be modifying the front in this example.
- Double click on
 . It will expand in the Tree and the front of the badge design will display in the design screen on the right. (NOTE: The card holder information displayed is a card holder in your database. If you don't have any card holders yet, the fields will be empty.)
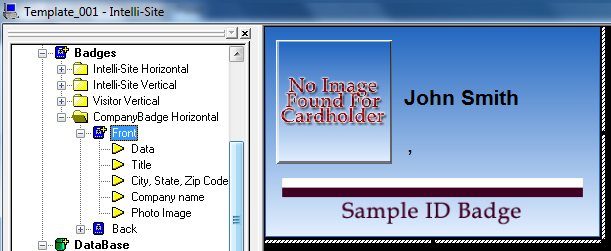
- The "Sample ID Badge" is a background image. To change it, right click on it. The Properties for Front appears. Switch to the "States" tab. Drag and drop the desired image into it. (Adding images to Intelli-Site is the subject of another article.)
- Drag and drop the barcode field onto the badge screen. In our example that field is EmployeeNO. It will appear in the Tree as the last node in the list under
 . Right-click on it and select "Properties...". Change the Name to something that makes sense. In the example, the name is "EmployeeNO Barcode".
 - Switch to the "Source" tab. Look closely at the Database Fields. The field you dragged and dropped is in the first drag and drop box. This won't work for scanners that require the start and stop characters. If your scanner doesn't require them, you may skip to the next step.
- Drag and drop the BarcodeStartStop field we created in the previous section into the first and the third Database Field.
- Drag and drop the barcode field into the second Database Field. In this example, it is EmployeeNO.
- In the Separators fields enter the correct delimiters for your scanner. The first one is the start code and the second is the stop code. Most of the time these delimiters are an asterisk, '*'.
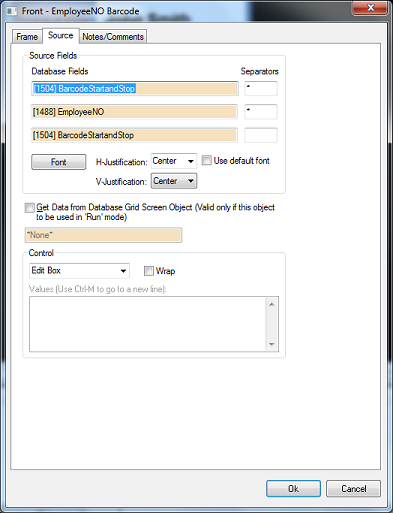
- Click on <Font> to bring up the font editor. Select the correct barcode font for your scanner. If it isn't in the list, you must close down the Workstation, install the font and then restart the Workstation. You will have to play with the size of the font to get it to scan properly. The documentation for the scanner may specify the correct font size.
- Click <Ok>.
The badge design is complete. In Card Management mode, add or edit a card holder. Switch to the "Badge" tab. Select the badge you just designed from the Type: drop down menu. Print the badge.
NOTE: In Multi-ID mode, remember that barcodes are part of a card and not a Dossier. The card holder must have a card associated to be able to SAVE the desired badge design in Card Management Mode.
Products