Once the project is completed on the Master Server, your are ready to enable Server Redundancy.
Master Server Properties
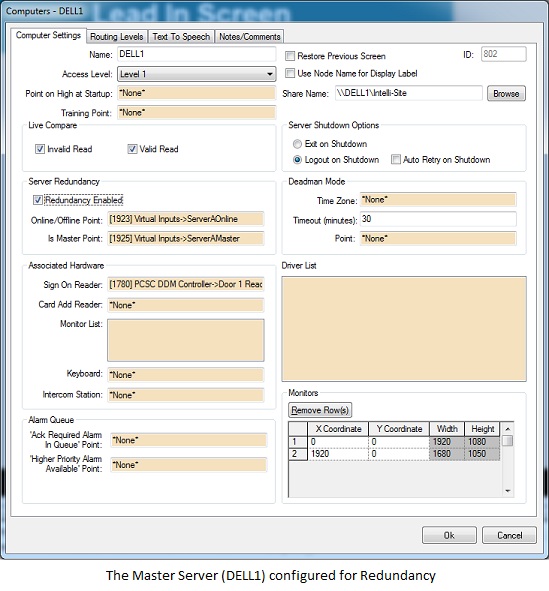
The Master Server is the first computer in the list under the "Computers" node in the Project Tree. There are few properties that need to be configured to enable redundancy.
- Expand the "Computers" node in the Project Tree then right-click on the Master Server which is the first computer listed. Select "Properties..."
- Click the <Browse> button in the upper right quadrant. Select the Intelli-Site network share on the Master Server or type the name in the field.
- Check the "Redundancy Enabled" check box. A notice will pop up informing you that the Server will have to be restarted to enable/disable redundancy. Click <OK>.
- Drag and drop the virtual point "ServerAOnline" into the "Online/Offline Point:" field.
- Drag and drop the virtual point "ServerAMaster" into the "Is Master Point:" field.
Slave Server Properties
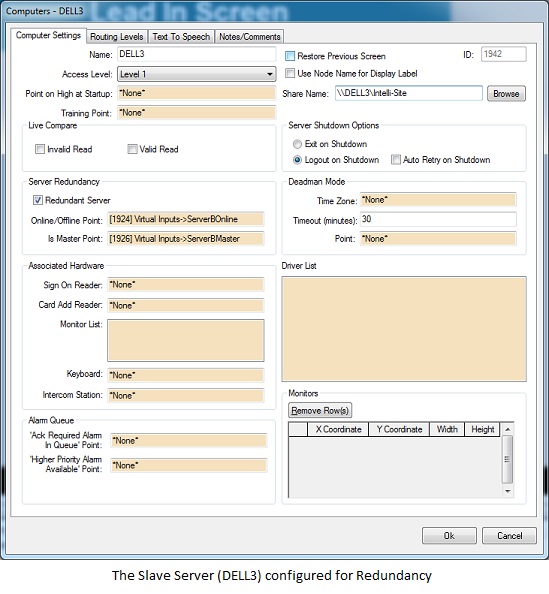
The second node in the list under the "Computers" node is the Slave Server. If it hasn't been added, do so by clicking on the "Computers" node and selecting "Add Node...". If it isn't the second one in the list, drag all of the nodes in front of it except for the Master Server onto the "Computers" node. The dropped node will be moved to the end of the list. Once the correct node is the second one in the list, configure it as follows:
- Right-click on the Slave Server which is the second computer listed. Select "Properties..."
- Check the "Redundancy Enabled" check box. A notice will pop up informing you that the Server will have to be restarted to enable/disable redundancy. Click <OK>.
- Click the <Browse> button in the upper right quadrant. Select then Intelli-Site network share on the Slave Server or type the name in the field.
- Drag and drop the virtual point "ServerBOnline" into the "Online/Offline Point:" field.
- Drag and drop the virtual point "ServerBMaster" into the "Is Master Point:" field.
Copy the Project File
At this point, the Master Server is fully configured and ready to go. We need to copy the Project over to the Slave computer so it will be ready to go as well.
- On the Master Server, Right-click on the Server icon,
 , in the System Tray and select "Immediate Shutdown". If you cannot see the Server icon, please read Why can't I see the Intelli-Site icons in the System Tray?
 - On the Slave Server, copy the complete Project folder from the Master Server to the Slave Server's Intelli-Site Sites folder.
Start the Servers
You may now start the Intelli-Site Servers beginning with the Master Server. It will take approximately 90 seconds before assuming the Master role. It's 90 seconds because that is the default value for the "Keep Alive Timeout" in the "Server Registration". Once the Master Server is up and running, start the Intelli-Site Server on the Slave computer.
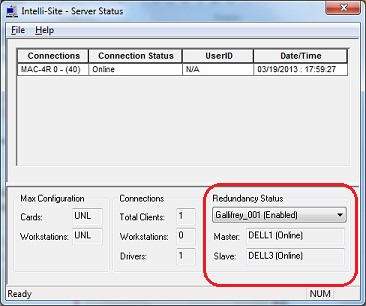
To see the status of the redundant Servers, right-click on the Server icon and select "Open...". The "Intelli-Site Server Status" window appears. In the lower right hand corner of the window is the "Redundancy Status" group box. The top box in this group is the name of the project, Gallifrey_001, and whether or not redundancy is enabled. Below that are the status boxes for the Master and the Slave. The current Master will be listed in the "Master:" field and if it is Online or Offline. The same for the "Slave:" field.
Workstation Registration
Each Workstation must be registered to both Servers. Remember that each computer that will connect to the Server must be defined as a Computer node in the Project.
- Start the Workstation. If the "Logon" screen appears, click <Cancel>.
- Click <Menu> and click "Modify Workstation Registry Information" icon,
 .
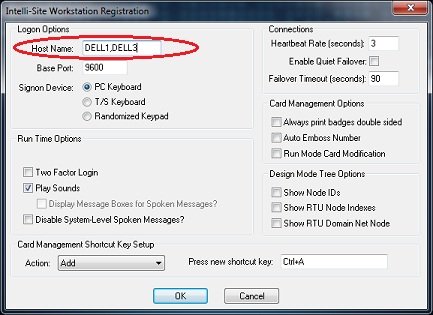
. - In the "Host Name:" field, type the names of the Servers separated by a comma with no space. The Master Server name is first. The Slave Server name is second.
Driver Registration
There are two parts to Driver registration: the configuration of each Driver as well as the association of a Driver to a computer in the Project.
Driver Configuration
Each Driver on every DriverService must be configured. The following steps must be performed for each Driver on every DriverService.
- Right-click on the DriverService icon,
 , in the System Tray and select "Open".
 - Right-click on a Driver and select "Configure". The configuration window will appear.
- In the "Host Name:" field, enter the names of the Servers, Master Server first with a comma and no spaces between them.
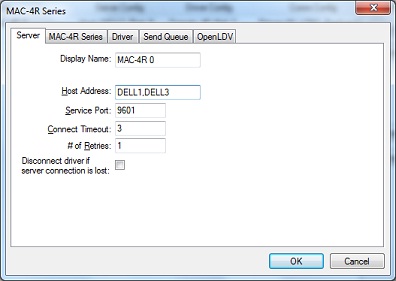
It is important to iterate that this must be done for all Drivers on every DriverService.
Project Modifications
In addition, both Servers need to know where all the DriverServices are and which Domains can be controlled by which DriverService. In Redundancy, the DriverService does not bring a Driver online unless the Server tells it to. In fact, when the DriverService detects the Server is missing, it will take all of its Drivers offline until a Server comes online and tells it to bring the Driver online. How redundancy works is the subject for a different article.
For each computer that is running the DriverService, do the following:
- Right-Click on the computer node and select "Properties..."
- For each Domain in the Project, drag and drop one RTU that is in said Domain into the "Driver List".
For example, Area 51, WHSE13 1.1, and WHSE13 1.2 are all in Domain 40. Only one of these RTUs needs to be dragged into the "Driver List". One Driver connects to the whole Domain.