|
|
How do I setup auto-logon in Intelli-Site?
| Author: Lori Tassin Reference Number: AA-00449 Views: 27009 Created: 03-25-2014 03:07 PM Last Updated: 08-14-2014 10:05 AM |
0 Rating/ Voters
|
     |
To set up auto-logon in Intelli-Site, you will have to add four (4) entries to the Registry to define the username, password, and project, and to enable auto-logon. Where those entries go is different depending on whether the Windows OS is 32- or 64-bit.
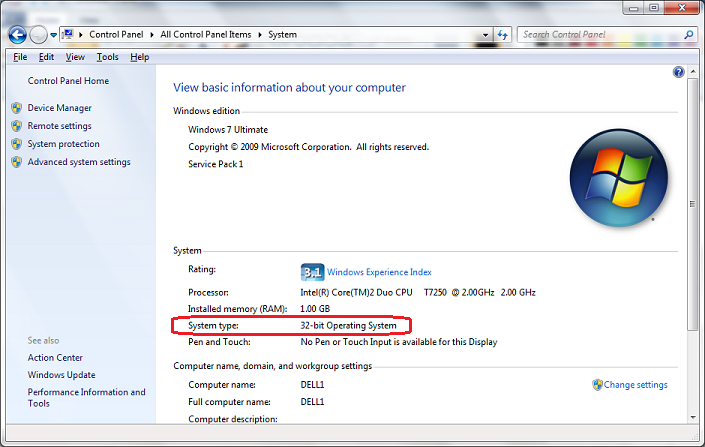
- Open the System control panel.
- Locate the "System Type" in the System group. This will tell you if the OS is 32- or 64-bit.

Note: Auto-logon will not work if the registry keys are not in the correct location. Now that you know the OS type, you can add the necessary registry keys. - Exit the Workstation. Make sure it isn't running.
- From the Windows Start menu, run regedit.exe. This launches the Registry Editor.
- Navigate to the Workstation registry entry. Where this is depends on the OS type.
- 64-bit OS: HKEY_LOCAL_MACHINE\Wow6432Node\Software\Intelli-Site, Inc\Intelli-Site\Workstation
- 32-bit OS: HKEY_LOCAL_MACHINE\Software\Intelli-Site, Inc\Intelli-Site\Workstation
- Add the registry key AutoLogonUser. When deciding which user to specify as the AutoLogonUser, please be mindful of the security considerations. If this computer is in an unsecured location, you may want to define a user with minimal rights.
- In the pane on the right hand side, right-click and select "New" -> "String Value".
- Name the new registry key AutoLogonUser.
- Right-click on AutoLogonUser and select "Modify..."
- Set its value to the name of the user that will be the account used for the automatic logon.
- Click [OK].
- Add the registry key AutoLogonPassword
- In the pane on the right hand side, right-click and select "New" -> "String Value".
- Name the new registry key AutoLogonPassword.
- Right-click on AutoLogonPassword and select "Modify..."
- Set its value to the password for the user specified in AutoLogonUser.
- Click [OK].
- Add the registry key AutoLogonProject
- In the pane on the right hand side, right-click and select "New" -> "String Value".
- Name the new registry key AutoLogonProject.
- Right-click on AutoLogonProject.
- Set its value to the name of the project (ie. Template_001).
- Click [OK].
- Add the registry key AutoLogonEnabled
- In the pane on the right hand side, right-click and select "New" -> "DWORD (32-bit) Value".
- Name the new registry key AutoLogonEnabled.
- Right-click on AutoLogonEnabled.
- Set its value to 1.
- Click [OK].
Now, when you launch the Workstation, it will auto-logon. Note: If the Workstation fails to auto-logon, make sure the values for AutoLogonProject, AutoLogonUser, and AutoLogonPassword are correct.
|
| |
| |
| |
|
|
|
|
|