Once Intelli-Site is installed and OpenLDV is installed and configured, you are ready to add a MAC-4R device to the Intelli-Site Project. There are two parts of the Intelli-Site suite that are involved in the adding and configuring a device in Intelli-Site. One is the DriverService which provides the conduit for communication between the Server and the MAC-4R. The other is the Workstation which is the user interface to the Intelli-Site system. It doesn't matter which one you do first as long as both are done and the data is the same in both places. After bringing the MAC-4R driver online, set the address of the MAC-4R Controller.
Adding a MAC-4R Driver to the Intelli-Site DriverService
To add a MAC-4R driver to DriverService, right click on the DriverService icon  in the System Tray. You may need to expand the Tray to show hidden icons. Select "Open". The Intelli-Site Driver Configuration Screen will appear. It displays all of the drivers that have been installed and configured. If you just installed Intelli-Site as you follow this quick start guide, the window is most likely empty.
- Click <Add>. The Choose Driver Type window will appear.
- Highlight "MAC-4R Series" and click <OK>. The Choose Communication Type window displays.
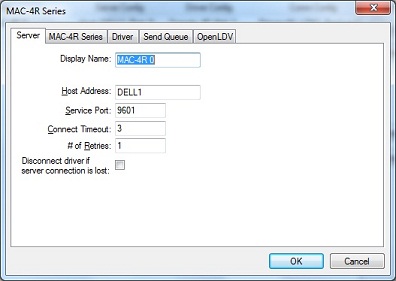
- Select "OpenLDV". The MAC-4R window displays. NOTE: "Rs232" and "TCP/IP" are for legacy systems only.

- Go to the "OpenLDV" tab. Select the proper OpenLDV port: LON1, LON2, or the name you gave it (e.g., X.Default.WHSE13).
- Go to the "Driver" tab and provide a unique domain number. The default is 40. It can be any number between 1-255. The domain number must match the Domain field on the MAC-4R RTU in the Project. Make sure the Net field matches the Echelon subnet of the MAC-4R panels. The default values for the rest of the fields are good. Click <OK>.
After the MAC-4R RTU is added to the Project using the Workstation, you may bring the MAC-4R online. Until you bring it online, the icon will be blue. To bring the driver online, right click on it and select "Online". If it finds the MAC-4R and the Server, the icon will be green/green. If it cannot connect to the MAC-4R, the bottom box will be red. If it cannot connect to the Server, the top box will be red.
Adding a MAC-4R RTU to Intelli-Site
The Intelli-Site Server must be running to add to or modify the Project. In the System Tray you should see the Server icon. . You may need to expand the Tray to show the hidden icons. If not, use the Intelli-Site Loader to start all of the parts of Intelli-Site, even the Workstation. Otherwise, find the Workstation in the Intelli-Site folder in the Start menu. Logon using the user name "master" and password "m". The following will walk you through adding the MAC-4R RTU and configuring it.
- In Design Mode, expand System Layout -> Corporate Headquarters -> Area. Right click on Area and select "Add Node..." Select the correct MAC-4R device in the list under OSSI. Click <Add Node>.
- Right click on the node just added and select "Properties...". Change the name of the controller. We suggest using the building name with the Net and Node numbers. (WHSE13 1-1) Make sure the Domain and Net match the Domain and Net specified in the DriverService.
- Click <Ok>.
The driver is now fully configured and ready to be brought online. The panel will show up in the Alarm Queue as off-line because the Server is now trying to communicate with the controller.
Bring the Driver Online
Once the RTU is configure and the driver added to the DriverService, it can be brought online.
- Open the Driver Configuration Screen of the DriverService by right clicking on the DriverService icon in the System Tray and selecting "Open".
- Right click on the driver to bring online and select "Online". The icon should go from blue/blue to green/green. The top box of the icon indicates the state of communication with the Server. Green is good. Yellow means the connection is timing out, which can happen if It found the port but not the Echelon adapter. Red means the system cannot connect to the port at all.
Configure the MAC-4R Controller
Now that the communication to the MAC-4R has been established, it must be configured. The address must be set for the panel and the inputs need to be defined as Normally Opened or Normally Closed depending on their specific wiring.
First, set the address. The default address of any MAC-4R control panel 1.120. It should be the Net/Node address in Intelli-Site which starts at 1.1 and goes up from there. To set the panel's address, Intelli-Site needs the unique neural ID of the panel.
- Open the RTU "Properities..." of the panel.
- On the MAC-4R panel, press the SERVICE pin.
- A window pops up in Intelli-Site saying, "Neural ID received. Set new ID?" Click <Yes>.
- Click <Apply> to save the new Neural ID.
- Click <Load Device Address>. A window will pop up asking, "Set Rtu ID#?". Click <Yes>.
- Test the communications by clicking on <Set Time>. If it works properly, you shouldn't see an Offline alarm in the Alarm Queue. You will only receive feedback if something goes wrong.
- Now click <Complete> to do a complete download which will update the settings and download the cards to the control panel.
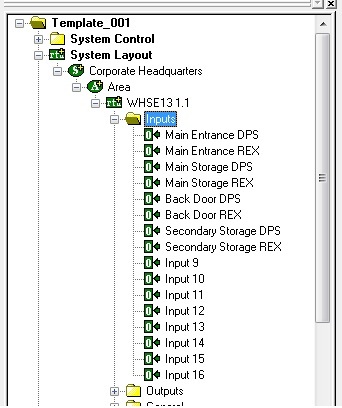
Now that the panel's address is correct, we strongly suggest you name the panel and doors to reflect their purpose and location. The names of the panel and doors are added to the history file, so by including the building name in the name of the panel, you won't need the building name in name for the doors. In our example above, we named our panel "WHSE13 1.1" The doors are "Main Entrance", "Main Storage", "Back Door", and "Secondary Storage".
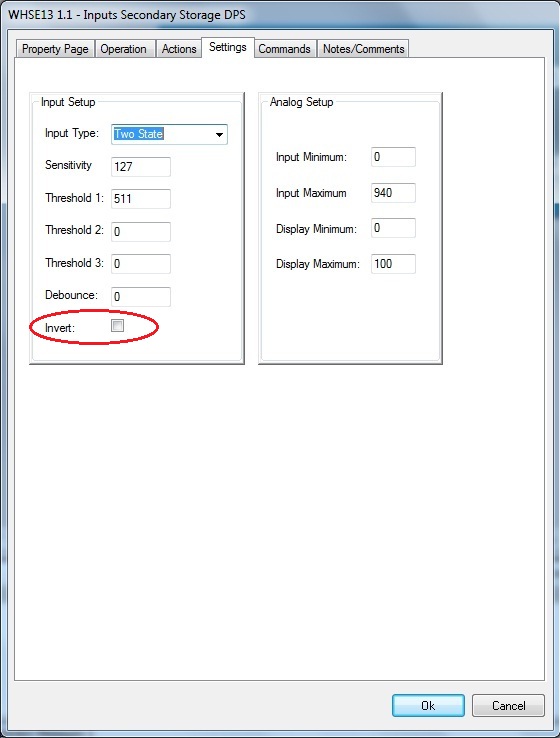
After naming the doors, we need to configure the Inputs to reflect the Normal state for each door. If the Input is "Normally Closed" the "Invert" check box on the Settings tab must be checked. If the Input is "Normally Open", the check box must be clear. "Normally Open" is the default for an Input in Intelli-Site. For each Input that is "Normally Closed", do the following:
- In the Project tree, expand the panel node to see the Inputs node. Expand the Inputs node. All of the Inputs for the panel will appear.

- Bring up the "Properties..." dialog for an Input that is "Normally Closed". Click on the "Settings" tab. Click the "Invert:" check box.

- Click <Ok>.
Repeat steps 1-3 for each
Input that is inverted. When all of the inverted Inputs are configured, download the settings to the panel by opening the "
Properties..." of the
RTU and click <
Settings>. The panel is now fully configured and ready to use.